If you’re looking for ITIL-certified project management and ticket tracking solutions, frankly speaking, you’ll end with Jira and ServiceNow. We analyzed the market, shortlisted and compared the tools to tell you these are the best two solutions for their purposes. Still, each has its peculiarities and distinctive features, making them no substitute for each other.
Considering their popularity, most of the businesses are already using one of the solutions. Some companies use both to cover the entire service life cycle and manage diverse teams. But in every organization, the time comes when they need to choose – Jira or ServiceNow – for financial and organizational reasons.
Tough choice, but what if you don’t have to make it?
Today we’re going to describe how to bring together the functionality of Jira and ServiceNow with the help of our new plugin and how it could benefit your business.
ServiceNow and Jira integration is the double profit
Integration means combining processes, teams, and tasks. By integrating tools, you double both the software capabilities and the functionality of experts, as they don’t need to master the new solutions. This applies to:
- Developers and managers who choose Jira as a default solution for basic ITIL processes maintenance.
- Support teams that use ServiceNow.
Such differentiation is standard practice for big and medium-sized companies. For example, we recently integrated Jira with ServiceNow for a well-known American university seeking to improve its workflow.
Before
The departments worked in both solutions but solved similar problems separately from each other.
Now
All IT specialists work in one system, which synchronizes their activity automatically.
To unite Jira and ServiceNow for the university, we worked with both solutions and added customized infrastructure from each side:
- Developed, installed, and configured Jira Sync application for ServiceNow.
- Developed, installed, and configured ServiceNow Sync application for Jira.
Besides the standard integration process, we also added some additional functions which simplify the work in the new system:
- Quick access to Jira plugin from the ServiceNow panel.
- “Resync” option to prevent the loss of any ticket in Jira.
- Scheduled Sync to automate the repeated synchronization.
As a result, the university obtained a more efficient workflow where all the tickets from ServiceNow are also created in Jira automatically. This makes it possible for IT specialists to react immediately to new issues.
ServiceNow and Jira integration not only unites the teams but also helps them migrate to another solution. When we switch our clients from ServiceNow to Jira, the two systems temporarily work in parallel. For the time, we create an automated link between them – tickets duplicate automatically, so they don’t have to transfer all the data manually.
How do we integrate both systems together?
It’s possible to create and integrate custom apps in both tools using Jira Applications and ServiceNow Applications. We developed a plugin and implemented it into both tools.
ServiceNow Customization
To create an application for ServiceNow, the developers can use HTML, CSS, Angular, JS or API ServiceNow (JS). We chose JavaScript for our customization.
ServiceNow has its system for development – Studio SDE. After the development, the app is exported as ServiceNow Update Set in XML. This XML file can be set up to any ServiceNow instance for integration with Jira.
Installation and configuration of Jira Sync app for ServiceNow:
- Go to the System Update Sets → Retrieved Update Sets.
- Find the Related Links tab.
- Click the Import Set from XML.
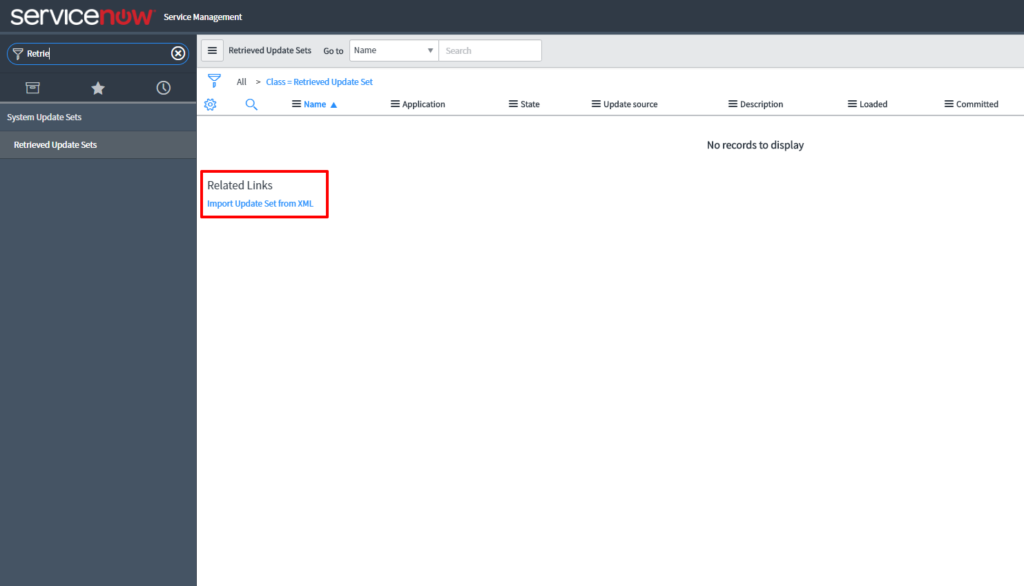
4. Choose the XML file with the app (in the Jira-integration-plugin folder).
5. Click the Upload button.

6. Find the downloaded Update Set in the Retrieved Update Sets List and click on it.

7. Click on the Preview Update Set.
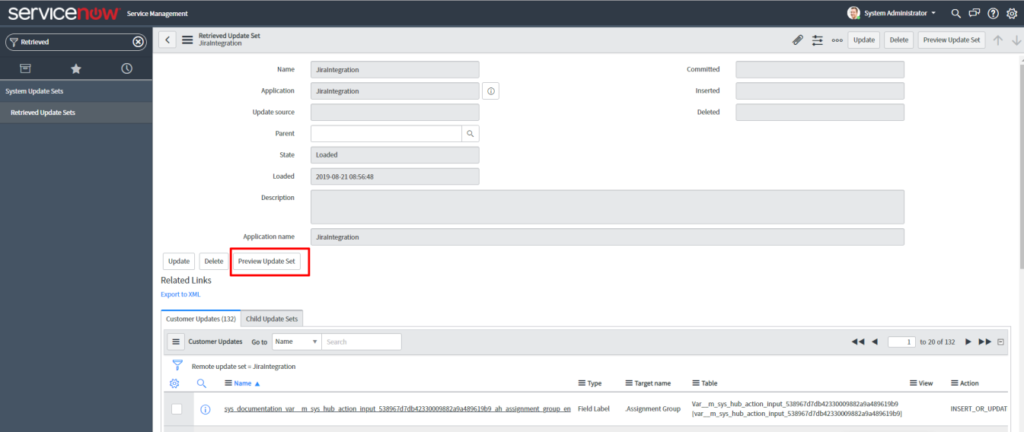
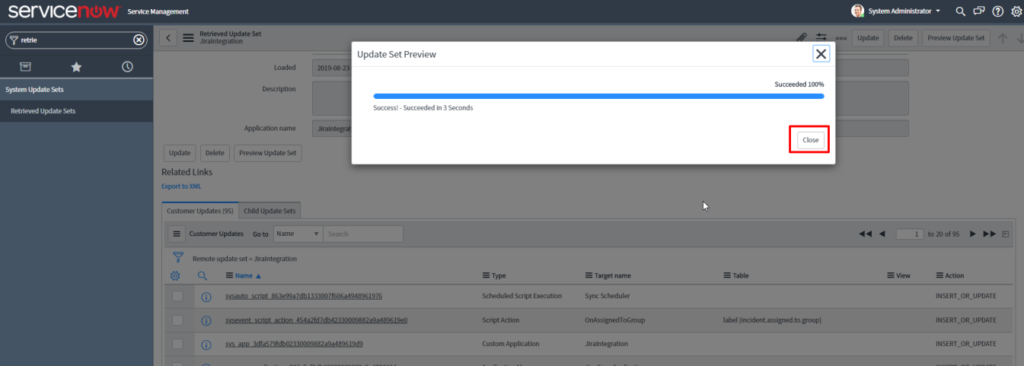
8. When the Updated Set preview is ended, close the pop-up window.
9. Click on the Commit Update Set.
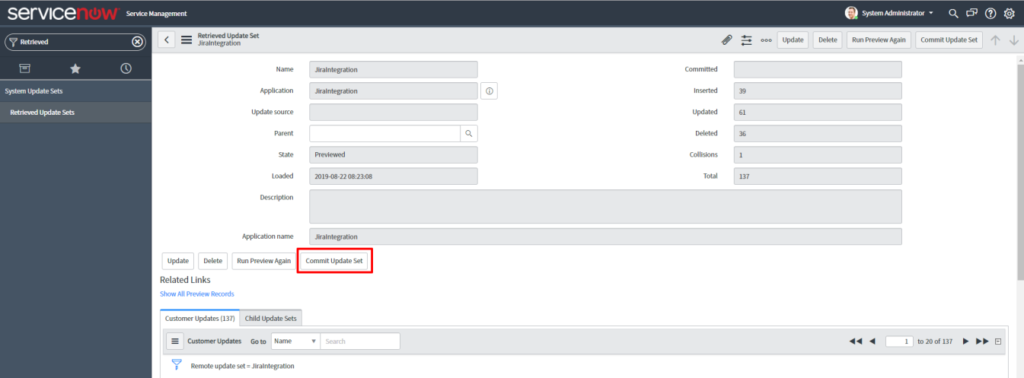
After the Update Set is implemented, the basic configuration is required.
Jira Sync app configuration
- Go to Jira Sync Application menu.
Jira Settings:
Go to Jira Settings menu and add basic configuration to access Jira system.

Fill in all the fields.
Enable/Disable Jira integration plugin:
Checkbox ON/OFF to sync with Jira. If it’s unchecked, the sync won’t happen.
To access Jira Basic authentication, you will need:
- Username – the user name to enter Jira system
- Password – Jira user password
- Jira URI – basic Jira URI to sync.

Sync plugin configuration
- Go to Sync Settings menu.

Sync Settings are required for mapping between ServiceNow tickets and Jira projects identified with project keys. To sync them, an incident should be associated with a ServiceNow group and a Jira project:
- Jira Project – you need a project key to identify the project in Jira and create a new ticket in the current sync.
- ServiceNow group – associated group in ServiceNow. Assigning an incident to a group will lead to sync with the needed project in Jira.
The sync with the relevant project in Jira happens due to this key.
The project selected in the settings must be in Jira, or the sync won’t happen. You should also be sure that the group uses only one project key.
To add a new section in settings, click New.

An example of preconfigured mapping:

An example of settings for resync
Resync with an incident in Jira is required if there is an error in the net or if the configuration is changed. In this case, the system will mark the incident as unprocessed and resync it.
All unprocessed incidents are reflected on the Integration Sync page.

All syncs and possible errors are recorded in the system log.
How to schedule a synchronisation?
- Go to the Scheduled Jobs menu.
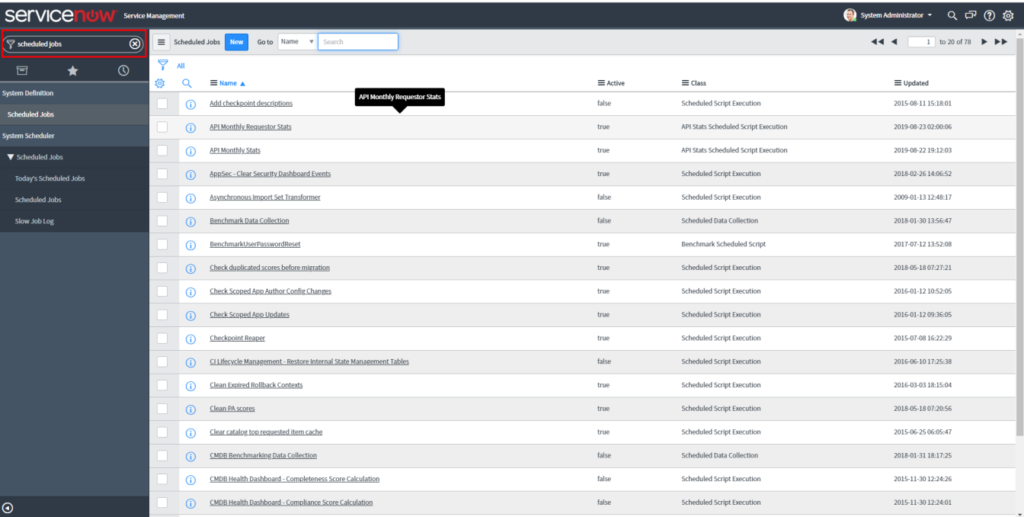
2. Find the Sync scheduler and click on it.
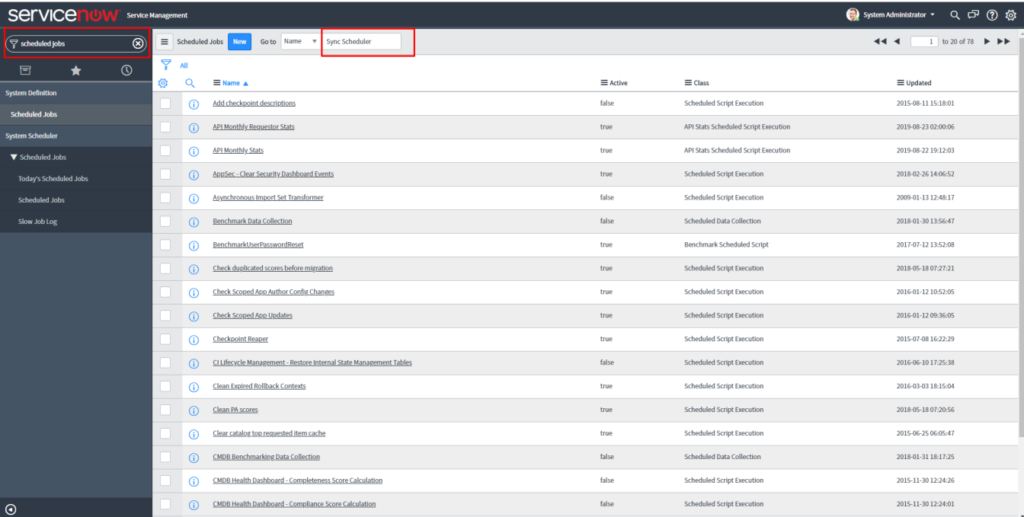
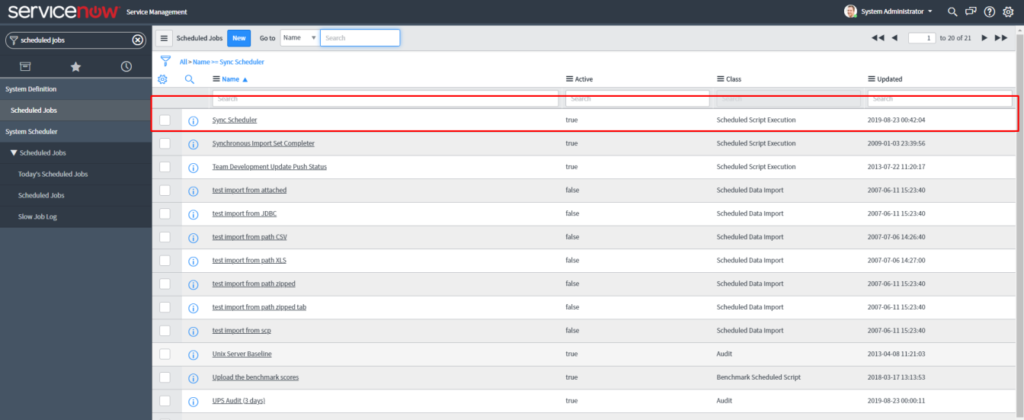
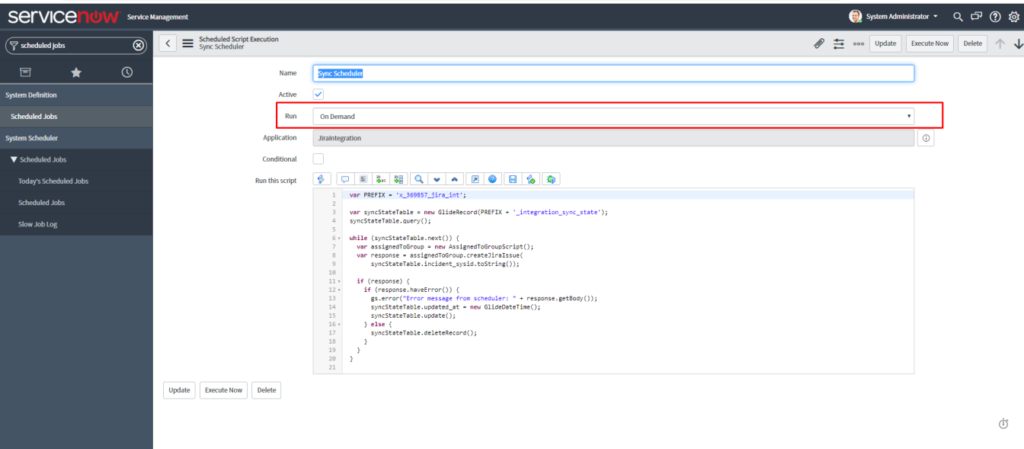
3. Schedule a periodical resync.


Jira customization
Apps for Jira are developed using JS (in the case of Jira Cloud – JS or JS frameworks). As a result, a JAR file is created, which is installed using the Universal Plugin Manager in Jira.
Jira ServiceNow Sync plugin installation and configuration
The process is similar to the ServiceNow app configuration but in Jira. The one different thing is filling in the Custom fields. We’ll explain this in a moment.
- Go to Jira Administration menu → Add-ons:
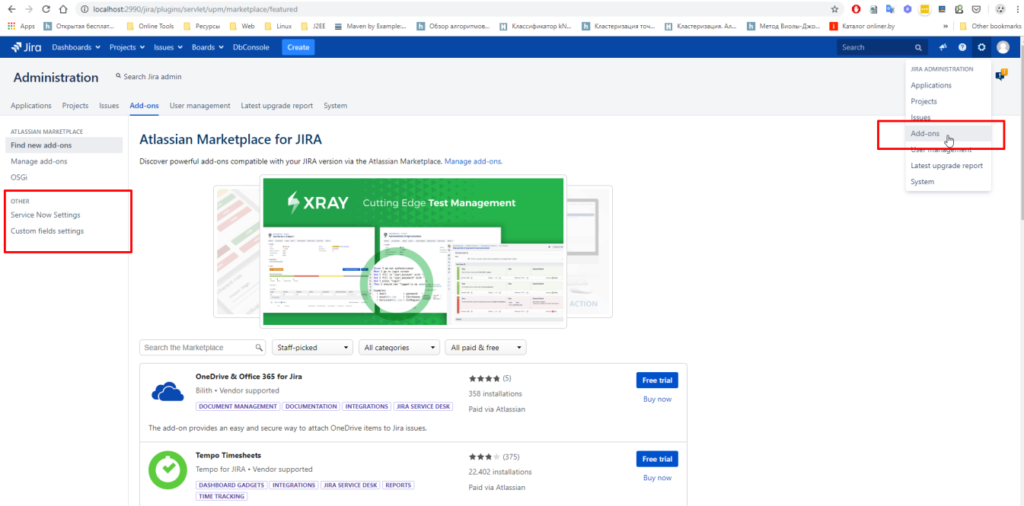
2. Open ServiceNow Settings
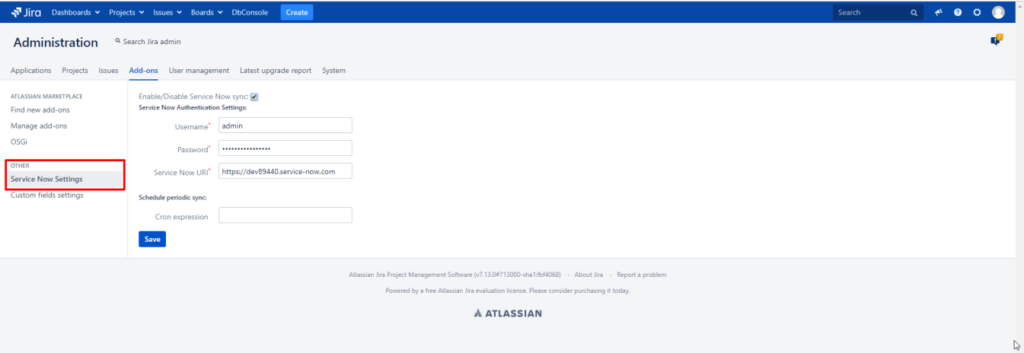
Enable/Disable Jira integration plugin – checkbox ON/OFF to sync with Jira. If it’s unchecked, the sync with ServiceNow won’t happen.
To access ServiceNow Basic, you will need:
Username – the user name to enter the Jira system
Password – Jira user password
Jira URI – basic Jira URI to sync.
It’s possible to schedule resync in the calendar with the help of Cron Expression app in the Schedule Periodic Sync settings.
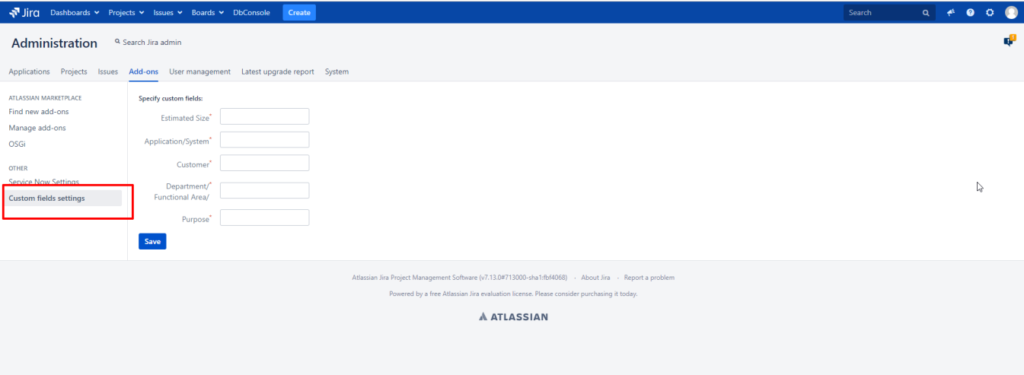
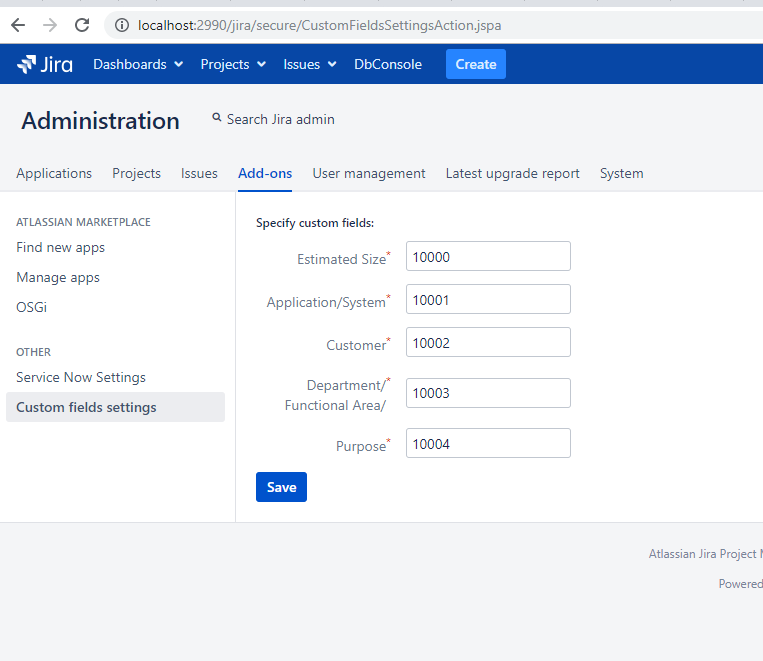
Custom Fields Settings that we mentioned earlier are the configurations of additional settings for the sync (Estimated Size, Application/System, Customer, Department/Functional Area, Purpose).
Custom field id is required. To find the id, go to the Administration → Issues → Custom Fields and click the Edit selected field. The id will be a part of URI.
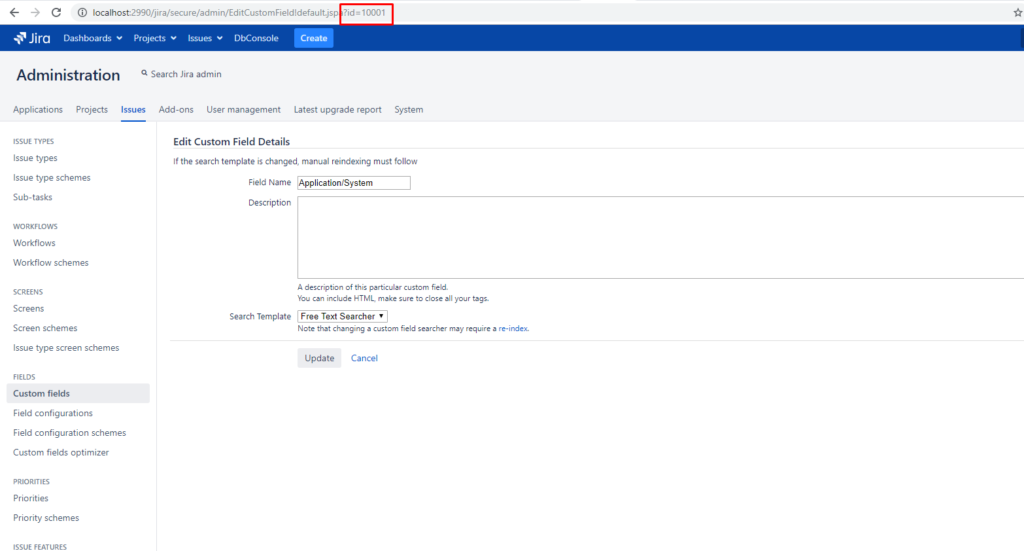
An example of custom fields configuration:
The integration described here successfully works in one of the most prestigious universities in the US thanks to Polontech. If your teams are still using Jira and ServiceNow separately, we will help you to unite them.
Let us tell you how all this could be used to benefit your company – it will take us no more than 30 minutes. Get the free call now, and those thirty minutes will save you months.


