
Atlassian connect
To get started with the framework, create a project from the Maven archetype by executing the following command:
mvn archetype:generate -DarchetypeGroupId=com.atlassian.connect -DarchetypeArtifactId=atlassian-connect-spring-boot-archetype -DarchetypeVersion=1.0.0
Maven will ask you to define the groupId, artifactId, and the version for your new project. You will also be asked to specify the Java package for your source code, which by default is the same as your groupId. Once confirmed, Maven will generate the source of a skeleton Atlassian Connect add-on, including:
- a POM with the required dependencies
- atlassian-connect-spring-boot-starter
- atlassian-connect-spring-boot-jpa-starter
- an application.yml file to specify Spring properties
- a Spring Boot application class
Let’s modify our server port. Edit application.yml and specify unused port: e.g. add line server.port: 9000.
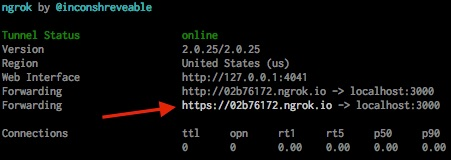
In order to get an add-on that is running on your personal computer (locally) installed in an Atlassian Cloud instance, you need to make it available on the internet, served over an HTTPS connection. To achieve this, there are many tools you could use, but we use ngrok. ngrok is a simple and free command line tool to tunnel your local development environment to the internet. From the command line, run ngrok http $PORT replacing $PORT with the port used by your add-on (e.g. 9000). Get the HTTPS URL from the command line, as shown in the following image:
Change the add-on’s JSON descriptor (atlassian-connect.json) to set the baseUrl to the ngrok URL from the previous step.
Let’s move on to the business logic and create entity, which represents our input field value associated with JIRA instance:
@Entity

public class SavedValueEntity {

  @Id

  private String clientKey;

  private String value;

  public SavedValueEntity() {

  }

  public SavedValueEntity(String clientKey, String value) {

      this.clientKey = clientKey;

      this.value = value;

  }

  public String getClientKey() {

      return clientKey;

  }

  public void setClientKey(String clientKey) {

      this.clientKey = clientKey;

  }

  public String getValue() {

      return value;

  }

  public void setValue(String value) {

      this.value = value;

  }

}
Then create a repository to work with the entity. Simply extend your repo interface from CrudRepository – no implementation is needed:
public interface SavedValueRepository extends CrudRepository<SavedValueEntity, String> {}We need to update Application class to enable JPA repositories:
@SpringBootApplication

@EnableJpaRepositories("com.polontech.connect.repository")

public class AddonApplication {

  public static void main(String[] args) throws Exception {

      new SpringApplication(AddonApplication.class).run(args);

  }

}
Service:
public interface SavedValueService {

  SavedValueEntity getByClientKey(String clientKey);

  void setForClientKey(String clientKey, String value);

}
And it’s implementation:
@Service

public class SavedValueServiceImpl implements SavedValueService {

  @Autowired

  SavedValueRepository savedValueRepository;

  @Override

  public SavedValueEntity getByClientKey(String clientKey) {

      return savedValueRepository.findOne(clientKey);

  }

  @Override

  public void setForClientKey(String clientKey, String value) {

      SavedValueEntity entity = new SavedValueEntity(clientKey, value);

      savedValueRepository.save(entity);

  }

}
Also, we need a controller to handle requests. We map GET /connect-view request to view template, GET /connect-edit to edit template and handle POST /connect-edit request to save the input value:
@Controller

public class ConnectSpringBootController {

  @Autowired

  private SavedValueService savedValueService;

  @RequestMapping(value = "/connect-view", method = RequestMethod.GET)

  public String getViewPage(@AuthenticationPrincipal AtlassianHostUser hostUser, Model model) {

      addValueAttributeToModel(hostUser, model);

      return "view";

  }

  @RequestMapping(value = "/connect-edit", method = RequestMethod.GET)

  public String getEditPage(@AuthenticationPrincipal AtlassianHostUser hostUser, Model model) {

      addValueAttributeToModel(hostUser, model);

      return "edit";

  }

  @RequestMapping(value = "/connect-edit", method = RequestMethod.POST)

  public void saveValue(@AuthenticationPrincipal AtlassianHostUser hostUser, @ModelAttribute("text-input") String value) {

      savedValueService.setForClientKey(hostUser.getHost().getClientKey(), value);

  }

  private void addValueAttributeToModel(@AuthenticationPrincipal AtlassianHostUser hostUser, Model model) {

      SavedValueEntity entity = savedValueService.getByClientKey(hostUser.getHost().getClientKey());

      String value = entity != null ? entity.getValue() : "";

      model.addAttribute("value", value);

  }

}
The Atlassian Connect JavaScript client library establishes a cross-domain messaging bridge between an Atlassian Connect iframe and the host product. All pages to be displayed within an Atlassian product must include a file called all.js, served from the product, in order to establish the bridge and so that to be displayed.
The URL to this file is provided by Atlassian Connect Spring Boot for every request. You would only need to add the following script to your pages:
<script src=”$atlassian-connect-all-js-url” type=”text/javascript”></script>
AUI provides a CDN, which will make your pages load faster and your resources won’t be out of date. In order to serve AUI’s resources from the CDN, you will need to include them in the HEAD of your HTML or template file.
Create reusable header for our two pages (resources/templates/header.vm):
<!DOCTYPE HTML>

<html>

<head>

  <title>$title</title>

  <meta http-equiv="Content-Type" content="text/html; charset=UTF-8"/>

  <script src="$atlassian-connect-all-js-url" type="text/javascript"></script>

  <link rel="stylesheet" href="//aui-cdn.atlassian.com/aui-adg/6.0.0/css/aui.min.css" media="all">

  <link rel="stylesheet" href="//aui-cdn.atlassian.com/aui-adg/6.0.0/css/aui-experimental.min.css" media="all">

  <script src="//ajax.googleapis.com/ajax/libs/jquery/1.8.3/jquery.min.js"></script>

  <script src="//aui-cdn.atlassian.com/aui-adg/6.0.0/js/aui.min.js"></script>

  <script src="//aui-cdn.atlassian.com/aui-adg/6.0.0/js/aui-experimental.min.js"></script>

  <script src="//aui-cdn.atlassian.com/aui-adg/6.0.0/js/aui-datepicker.min.js"></script>

  <script src="//aui-cdn.atlassian.com/aui-adg/6.0.0/js/aui-soy.min.js"></script>

</head>

<body>
Then create the page to edit the value (resources/templates/edit.vm):
#set($title="Edit Value")

#parse("header.vm")

<form class="aui" method="post">

  <div class="field-group">

      <label for="text-input">Input your value<span class="aui-icon icon-required">required</span></label>

      <input class="text" type="text" id="text-input" name="text-input" title="Text input" value="${value}">

      <div class="description">The value is associated with the JIRA instance</div>

  </div>

  <div class="buttons-container">

      <div class="buttons">

          <input class="button submit" type="submit" value="Save" id="save-button">

      </div>

  </div>

</form>

</body>

</html>
And the page just to view it (resources/templates/view.vm):
#set($title="View Value")

#parse("header.vm")

<p>Your saved value: ${value}</p>

</body>

</html>
Now we just need to describe these pages in the add-on descriptor:
"modules": {

"generalPages": [

  {

    "key": "polontech-connect-view",

    "location": "system.top.navigation.bar",

    "name": {

      "value": "View"

    },

    "url": "/connect-view",

    "conditions": [{

      "condition": "user_is_logged_in"

    }]

  }

],

"webSections": [

  {

    "location": "admin_plugins_menu",

    "key": "polontech-connect-section",

    "name": {

      "value": "Connect Spring Boot"

    }

  }

],

"adminPages": [

  {

    "name": { "value": "Edit" },

    "key": "polontech-connect-edit",

    "url": "/connect-edit",

    "location": "admin_plugins_menu/polontech-connect-section"

  }

]

}
Spring Boot application
Here we’ve added the View link to the System Top Navigation bar and created “Connect Spring Boot” section with “Edit” link at Admin Plugins Menu:

Run your Spring Boot application and upload the add-on to your Atlassian Cloud Instance.
Actually, when I tried to submit the form I faced with the bug ACSPRING-32: I got errors like “Expecting claim ‘qsh’ to have value A but instead it has the value B” at the backend. The reason of this is the Atlassian Connect JavaScript client library doesn’t take into account form-data payload for query string hash computation but Atlassian Connect Spring Boot does. As the result we get 401 status Unauthorized. I’d appreciate you for the vote.
Polontech team will be glad to help you with any Jira custom add on development and make Atlassian connect. Please contact us in such a need.


